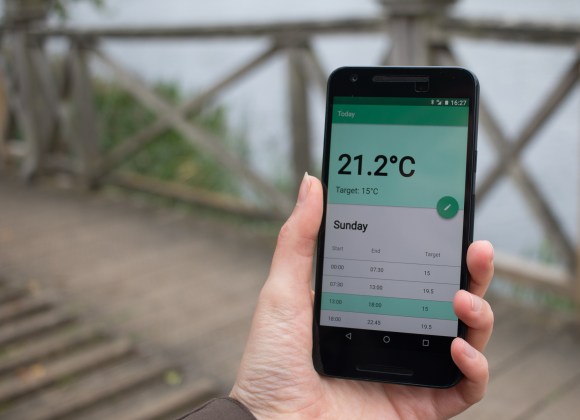
Previously we discussed the algorithms that can be used to control a domestic heating system, built a simple UI to schedule the temperature changes, and reverse-engineered a pre-existing RF relay to control the boiler. So far the web service that provides the UI has been deployed on a PC at home but, since you’re most likely to want to override your heating controls when you’re unexpectedly arriving home early or late, we need a site that can be reached from anywhere.
This article describes changes to the software that were necessary to achieve that, some discussion about the technical choices, and step-by-step instructions to set this up for yourself. If you’re here just for the step-by-step setup guide, jump to “Deploying BoilerIO on AWS”.
As usual, all source code is available under an MIT license on github.
Client, server, and device
In the previous article, we assumed that the hosts running the web service and issuing boiler control commands were on the same network and, in fact, probably the same host. To put BoilerIO online (i.e. provide access to controls from anywhere), this assumption is no longer true. Although you could contemplate putting the web-server host into the DMZ (i.e. exposing it to the Internet whilst retaining a connection to your network), this is a massive can of security worms and is not suggested. You could consider hosting your own server on a completely separate network if you have access to multiple public IP addresses, but this is not the common case and so is not discussed here.

So now, we have three distinct applications:
- Clients: Your phone or PC, hosting the scheduler application in a web browser and accessing and controlling heating controls provided by the service. This is a JavaScript/HTML web-app currently (though you could imagine other client apps such as an iOS app).
- The service: This provides the backend that everything else talks to: it stores schedule data, cached temperatures, and hosts the static files needed for the web UI. It could be run across several servers with a load balancer, but for a domestic installation a single, low-power VM is sufficient to host everything (the backend uWSGI app, the frontend web-server, and the Postgres database).
- Devices: This is just a special case of a client. Currently there’s no real difference in how they access the service, other than making use of additional HTTP endpoints to update the cached temperature on the server, etc. They execute the state the user has programmed via the web interface by interacting with the local infrastructure (e.g. issuing boiler commands). They are fixed ‘appliances’ running on the user’s local network and currently authenticate the same way as user-facing clients, using a shared secret.
In future, role-based access control could be used to restrict access to endpoints on the backend service depending on whether a device or user credential was used for authenciation.
Security considerations
With any online service there are always security risks and the possibility of unknown methods of attack exists. One future piece of work is to write a threat model for BoilerIO. In the meantime, some key considerations include:
- Ensuring that the backend service requires authentication as a user or device for any API access. See below for more info: this is currently achieved using HTTP Basic Authentication (over HTTPS), as supported by nginx.
- Ensuring that communication with the backend service is always encrypted. Again, this is implemented server-side: the web-server configuration redirects HTTP requests to the HTTPS protocol. The device code supports but currently doesn’t require HTTPS as this is not convenient for local-only deployments.
- Ensuring that the device doesn’t allow unverified certificates, to reduce the likelihood of man-in-the-middle attacks. This is the default for the device code and, for the UI, browsers should provide an indication if the certificate is bad.
- Sanitising inputs to try to filter out anything that might cause damage (either malformed or otherwise malicious input).
- Running all services with least privilege. All device code and service code should run as an unprivileged system user. Further improvements could be made by creating either SELinux or AppArmour policies for the modules.
- Not exposing anything unnecessary externally such as the database or any service on the device itself. The device now only makes outbound connections, and only requires HTTPS access to the scheduler service.
- Use of strong passwords, since you are in control of the entire deployment and can use utilities in your browser to store passwords, you can have separate secure passwords for each user and device that is accessing the service.
The backend service
Authentication of users and devices making API requests to the backend service ensures that only you and the devices you own can read and configure the heating schedule and state.
There are many ways of implementing authentication, either through the application itself or the web-server hosting it. Since BoilerIO doesn’t yet support authentication itself (e.g. via OAuth), an expedient way to achieve a reasonable level of security is to configure the web server to require HTTP authentication. Since I’m using nginx, I’m forced to stick with HTTP Basic Auth since their Digest Auth implementation is incomplete at the time of writing. It’s critical the authentication is done over a secure (HTTPS) connection to prevent credentials being stolen by capturing the authentication traffic.
Note that using Basic Auth means that, if someone acquires the HTTP requests in cleartext, the password will be directly available to the intruder. Although interception shouldn’t normally happen with TLS, you may, for example, be subject to man-in-the-middle attacks if you have rogue certificates installed on your system (so that your site looks legitimate to the browser but is being impersonated). This is sometimes the case on corporate systems employing SSL proxies.
For good overall security it is best to use long, random, machine-generated passwords to access your site. You can configure modern browsers to remember those passwords on computers you trust, and if you forget or lose them you can easily reset them.
The device(s)
The scheduler operates on the user’s local network to interface with temperature sensors and the boiler controller (any of which may be running on the same host) and uses the scheduler web service to get an up-to-date heating schedule.
Assuming that the “device software” is hosted on a private network, and not reachable from the Internet, then the main security considerations are:
- Protecting against invalid responses from the scheduler service, in case that has been compromised. The code as-is does do some validation of responses and will ignore faulty responses.
- Ensuring any parts of the local configuration, such as the MQTT broker, are sufficiently locked-down. This is up to the end user to configure.
Deploying BoilerIO on Amazon Web Services
Amazon Web Services (AWS) provides a cheap and convenient way of getting server resources with a public IP address. You may have access to alternatives including your own server, in which case the AWS-specific parts can be ignored or modified to suit your environment.
BoilerIO currently uses a Postgres database as a backend, so it’s most convenient to configure our own services on a VM. Elastic Beanstalk can provide a Python environment but then there’s still the database to be hosted and Amazon charge for the underlying EC2 instance anyway. I chose to use a Lightsail VM. Lightsail is essentially a simpler version of EC2, made to look more like a traditional VM hosting service with simple pricing and configuration.
For any of this to be useful, you need to have the pre-requisites including a temperature sensor (such as the EmonTH) with a compatible interface (for EmonTH, you can use the JSON mode I added to emonhub) between it and MQTT, and a way of interfacing with your boiler (such as the Danfoss RF interface running on a JeeLink v3c 433MHz, if you have a compatible Danfoss receiver).
Setting up the device side is a little complex as you need to get the above parts working together. More documentation will be added over time, as well as more complete coverage for other types of boiler setup and temperature sensor. For now, if you are technically-savvy and have the requisite hardware then you can set this up for yourself and use these instructions to configure the server side.
Step 1: Create your VM
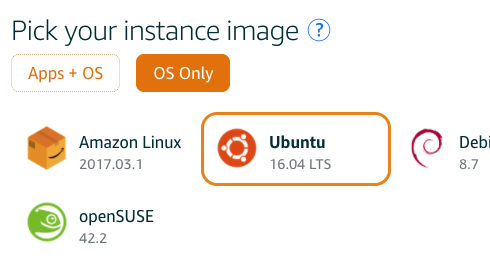
You need to have signed up for AWS. Once you have an AWS account, you can get to Lightsail from the AWS Management Console to configure both an ‘instance’ (a virtual machine), and a public IP address.
The instructions here assume an Ubuntu 16.04 LTS image,. A simple 512MB/1 VCPU/20GB SSD instance should be sufficient for this application, and is currently priced at $5/month.
You’ll need to configure a way to ssh into the VM. You can either use the web console, or connect in using either an existing ssh key or one that you generate. I prefer to generate a key locally and upload just the public key part. On Windows, you could use the PuTTY, or on Mac OS you can just use openssh directly from the terminal. All commands below are run on the server unless noted otherwise.
Step 2: Check out the BoilerIO code
The BoilerIO code is hosted on github; you can easily grab a copy:
$ git clone https://github.com/adpeace/boilerio.git
Step 3: Database configuration
The web backend for BoilerIO requires a Postgres database to be configured:
Firstly, install postgres:
$ sudo apt-get install postgresql
Then, we need to create a user for the backend. I would suggest using a long, random, password for this user, which you can generate using the pwgen utility. Once you have a password, create the user and database for the scheduler:
$ sudo -u postgres createuser -P scheduler
Enter password for new role:
Enter it again:
$ sudo -u postgres createdb scheduler
Then, create the tables etc. using the script in the boilerio repository:
$ sudo -u postgres psql scheduler <boilerio/scheduler.sql
[sudo] password for ubuntu:
SET
SET
...
Step 4: Installing the app
This is a simple case of installing the Python package:
$ sudo apt-get install python-setuptools
$ sudo easy_install pip
$ cd boilerio
$ sudo -H pip install .
The package also relies on a config file, /etc/sensors/config, as described in the README.md in the repository. Only the configuration options relevant to the web app are neede since we aren’t installing the other components on the server. A sample configuration file might look like this:
[heating]
scheduler_db_host = localhost
scheduler_db_name = scheduler
scheduler_db_user = scheduler
scheduler_db_password =
Step 5: Configuring uWSGI
uWSGI a web server that can be used to serve the BoilerIO flask app behind nginx. We use this because it is more performant, robust, and secure that the built-in werkzeug web-server provided as part of flask (which is only intended for development use). To install it, run the following:
$ sudo apt-get install uwsgi uwsgi-plugin-python
It’s best to run uwsgi apps as an unprivileged user, so we need to create the user and then set permissions of various locations appropriately
$ sudo adduser --no-create-home --system boilerio
Now, create a configuration for the app. Create the file /etc/uwsgi/apps-available/thermostat.ini:
[uwsgi]
socket = /var/www/boilerio/thermostat.sock
module = boilerio.schedulerweb:app
uid = boilerio
gid = www-data
chmod-socket = 664
Finally, create the directory for the socket, enable the app, and restart uWSGI:
$ sudo mkdir -p /var/www/boilerio
$ sudo chown boilerio:root /var/www/boilerio
$ sudo ln -s ../apps-available/thermostat.ini /etc/uwsgi/apps-enabled/
$ sudo systemctl restart uwsgi
You can check that it is running by checking the output of ps:
$ pgrep -a uwsgi
18503 /usr/bin/uwsgi --ini /usr/share/uwsgi/conf/default.ini --ini /etc/uwsgi/apps-enabled/thermostat.ini --daemonize /var/log/uwsgi/app/thermostat.log
18511 /usr/bin/uwsgi --ini /usr/share/uwsgi/conf/default.ini --ini /etc/uwsgi/apps-enabled/thermostat.ini --daemonize /var/log/uwsgi/app/thermostat.log
18512 /usr/bin/uwsgi --ini /usr/share/uwsgi/conf/default.ini --ini /etc/uwsgi/apps-enabled/thermostat.ini --daemonize /var/log/uwsgi/app/thermostat.log
To ensure uWSGI starts at systems startup, check that the RUN_AT_STARTUP variable is set to yes in the /etc/default/uwsgi file.
Step 6: Configuring nginx and HTTPS
To install nginx, simply run:
$ sudo apt-get install nginx apache2-utils
Step 6a: Let’s Encrypt!

To set up HTTPS, you can use the Let’s Encrypt! Certificate Authority to get a certificate for your HTTPS server that will be trusted by most browsers. Let’s Ecnrypt! provides domain-validated certificates, which are probably good enough for your needs. In order to get the certificate, you have to prove (with the help of a tool called certbot) that you are in control of the domain. This gives you a way of setting up secure communication to your site, but it does not prove to users that you are who you say you are beyond the fact you are the current owner of the domain.
To set up HTTPS using a Let’s Encrypt! certificate, you can follow the certbot instructions.
On AWS Lightsail, there is a firewall protecting your VM that you will need to reconfigure to allow HTTPS (port 443) incoming connections before configuring certbot.
Step 6b: Basic authentication setup
To use HTTP Basic Authentication, you need to setup a htpasswd file with usernames and hashed passwords. This shouldn’t be served over HTTP; it can be kept in /etc/nginx well out of the way of the HTTP server. The easiest way to create it is using the htpasswd utility. Since there isn’t a native nginx utility for this you can use the one from the apache2-utils package. You can install this, then create users for your site, using the -c option the first time around to create the non-existent file. We’re using sudo just to get write permission on /etc/nginx here:
$ sudo htpasswd -c /etc/nginx/thermostat_htpasswd

$ sudo htpasswd /etc/nginx/thermostat_htpasswd
It is recommended to use long random passwords here; you could generate these with pwgen(1), and then use your browser to remember the password. You’ll need to include the scheduler password in the /etc/sensors/config file on the host running the scheduler itself: for more info see the README.md in the repository, especially the section on the configuration fie.
Step 6c: nginx configuration file
Finally, you need to set up your configuration to serve the BoilerIO API and the static pages for the user interface. To do this, create a new configuration file that looks something like this under /etc/nginx/sites-available/boiler, then link it under sites-enabled and remove the default site:
server {
    listen 80;
    listen [::]:80;
    server_name ;
    return 301 https://$host$request_uri;
}

server {
    listen 443 ssl; # managed by Certbot
    ssl_certificate /etc/letsencrypt/live//fullchain.pem; # managed by Certbot
    ssl_certificate_key /etc/letsencrypt/live//privkey.pem; # managed by Certbot
    include /etc/letsencrypt/options-ssl-nginx.conf; # managed by Certbot

    root /var/www/html;
    index index.html;
    location / {
        auth_basic 'thermostat';
        auth_basic_user_file '/etc/nginx/thermostat_htpasswd';
        location /api {
            try_files $uri @boilerio;
        }
    }
    location @boilerio {
        include uwsgi_params;
        rewrite ^/api/(.*)$ /$1 break;
        uwsgi_pass unix:/var/www/boilerio/thermostat.sock;
    }
}
The config file above uses a different structure than that installed by certbot to redirect users from the HTTP site to the HTTPS site. The certbot version does work, but the above avoids the if statement (see If Is Evil) and doesn’t include any of the statements that would cause any content to be delivered within the non-SSL server block, reducing the chance of mistakes in future changes to the configuration file.
It is important that the 301 Moved Permanently response happens before the authentication. The sequence for a redirected request should be as illustrated here:
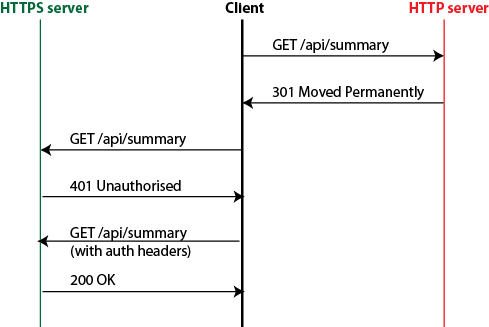
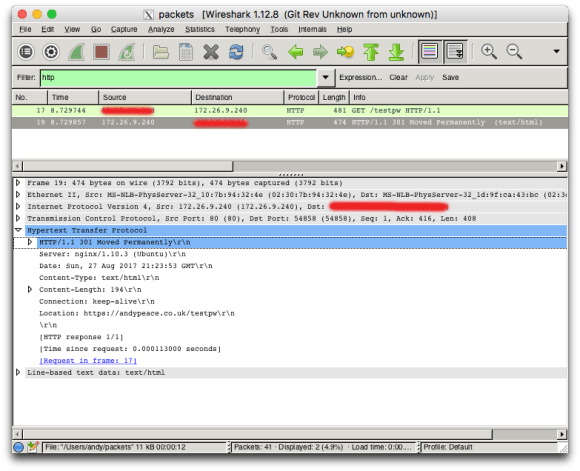
You can check that the flow is happening as you expect using a tool such as tcpdump or wireshark. If you run tcpdump -w packets -i eth0 or similar on the server, access the site from your browser, then open the packet trace created in Wireshark, and filter on http you should see the following – note no authentication requests are shown:
You can either modify the above configuration to serve the static files from elsewhere, or copy them into /var/www/html directory.
Conclusion
Setting up the service is currently not a simple operation but hopefully this article describes the process well enough to get a technically-savvy user started.
There is lots of further work to be done but, now we have the foundations set up, future articles can look at adding features such as sub-zone control and new types of sensor and actuator. Watch this space, and please comment with anything you’d be interested in seeing.
