
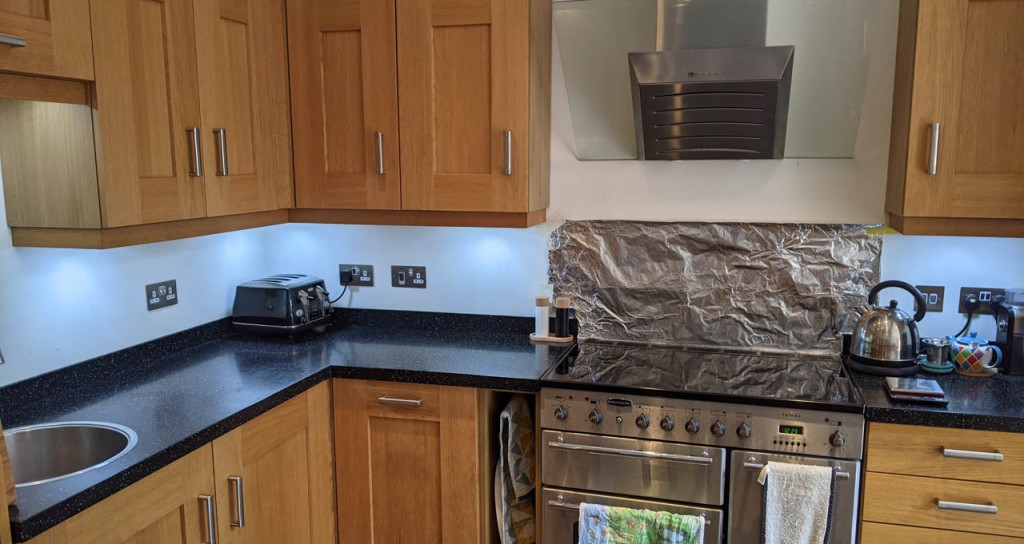
Our kitchen is almost 10 years old now. When we first had it designed and installed, I totally underestimated how important good task lighting was, but thankfully the designer knew better and included a set of under-cabinet lights to illuminate the work surfaces. The lamps in these faded, were replaced and the replacements starting failing, so now it’s time to take on installing some nice smart lighting to make things even more functional.
I’m a big fan of dimmable lighting to set the mood at night and reduce eye strain that also can provide practical lighting for tasks when needed. I also enjoy lighting that has adjustable white points since lots of blue-light exposure at night seems to be correlated with lower sleep quality.
I decided LED tape and a semi-custom installation (separate controller/wiring, but not going so far as coding up my own controller via Arduino or similar) was the way to go as it has grown in popularity and maturity over the last few years. I’ve replaced all the light fixtures with a set of three cool-white/warm-white adjustable strips from LEDspace and then used a ZigBee controller to connect it with the Phillips Hue bridge I already have.
Here’s the story of the outcome and what I did.
Was it worth it?
I’d say a qualitifed “yes”. I like that the LED strip eliminates bright/dark areas that we had with the old GX53 fittings. I like being able to dim and adjust the lighting, but…it’s also a bit of a chore. I think the real value in this kind of installation comes from automation. The smart controller we used works well with Phillips Hue, though it doesn’t seem to have the “on startup” configuration and instead will switch on the whatever the last setting was. The 9W/m tape I used is just about bright enough, but I have a niggling wish for a bit more brightness. In total we have 3m of 9W tape, so 27W, compared with 7×4.5W lights before for a total of 31.5W.
After the novelty has worn off, I at least personally won’t be manually adjusting the lights on a regular basis. Unless you’ve made all lighting in the room smart, in which case you can use a scene switch to replace rather than augment the standard light switch (and even then, retrofitting is going to be non-trivial), it will need to work correctly with the existing switching. The options for manual switching are voice (via Alexa/Google/Siri), app (e.g. the Hue app), or a separate scene controller (such as the Hue remote; but then this introduces annoying user experience issue from the interaction with any existing switching).
I’d like to do two things in future: get smart control on more of the lights in the kitchen and dining area to make scenes (set via either Alexa or a remote control) more functional, and also consider integrating presence sensing to dim the lights automatically.
Getting started
The first hurdle was to figure out the wiring. Having decided I wanted a colour-temperature controlled LED strip, I knew I needed three wires to the LED strip. The existing installation consisted of a set of lights and a light on its own, switched from one place. The light on its own was fed a switched mains in a 2-core-and-earth cable from a junction box near the group of lights. The group of lights were fed the same switched 240V mains supply and were connected via a splitter with custom sockets that fed each light fitting.
Choosing an LED strip type
Choosing the type of LED strip can increase or decrease the complexity of the wiring. I was able to perform the nasty hack of re-using the mains cable that was already fed through the walls to the second location as a 24V supply with two rails (for warm and cool white), since the 24V doesn’t require a double-insulated cable which means I could use the wire normally used for earth in a mains setup as one of the rails. The LED strips options you can choose are:
- Fixed white: This is the simplest option. You can buy a fixed colour temperature LED strip, which would require a simple two-wire connection. It’s probably the most flexible in terms of frequency of cut-points, manufacturers, and varieties such as splash-proof and “spot-free”/chip-on-board. Since these are widely available you can get brighter strips easily and with good colour rendering indexes (CRIs). The CRI describes how much of the colour spectrum is emitted by the light: higher values mean better reproduction of colours under the light.
- Colour-temperature changing white: This is the option I went for. Like the single-chip type white strips these are dimmable but have two colours of LED (cool and warm white) that can be used in combination to make a broad range of colour temperatures. They typically require three connections (+24V, warm white, and cool white). Since the extra chips take up physically more space the cut points seem to commonly be less frequent: the strip I have can be cut at 100mm intervals instead of 50mm on many of the single-temperature strips.
- RGB: These have LEDs that can emit different intensities of red, green, and blue to make a full range of colours. They typically require four connections, can often be less bright than similar white strips and don’t render whites as nicely as a dedicated white strip. For the kitchen task-lighting I was installing I ruled out this type of strip because I wanted to optimise for good white rendering. Also in my case I needed to re-use an existing three-core cable.
- RGB-W and RGB-WW: These are like RGB strips but also have either one or two dedicated white LEDs to make the rendering of whites as good as regular white-only strips. They’re the most expensive and complex, requiring either five or six connections.
Powering and controlling the LED strips
The LED strip will require either 12V or 24V power, depending on the type you chose. Mine required 24V. You can wire many LED strips in parallel since each group of LED chips between the cutting points are in parallel on the strip. Wago connectors to join all the wires of the same type seem to work well and are easy to install.
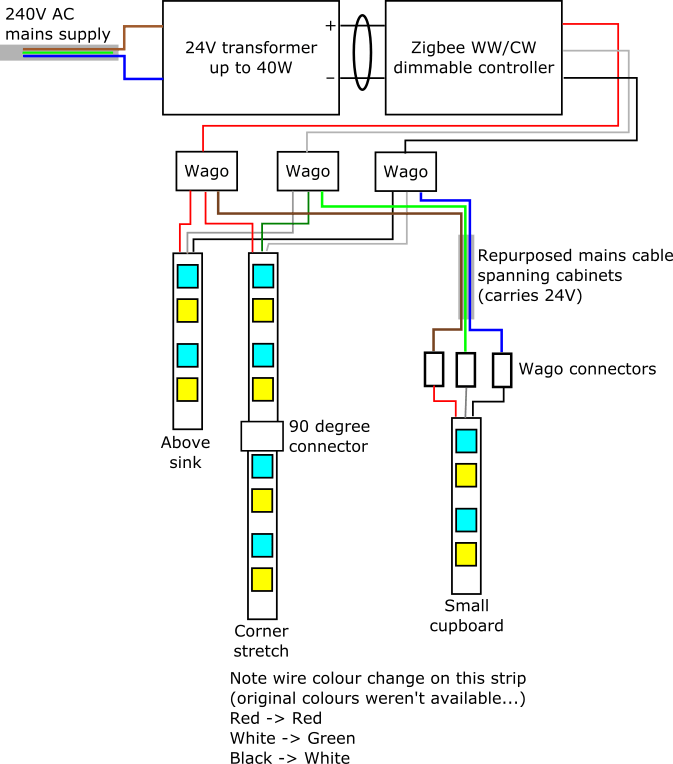
A common wiring would be a power supply to convert 240VAC mains to 24V, then a controller module to do dimming and colour temperature control, and then each strip wired in parallel. In my case, I was able to wire all the strips to the controller directly so they appear as a single light in the Hue app. If you aren’t able to do that, for example if you have some strips that have a separate power supply, then you can always use multiple transformers and controllers though in this case the LED strips will show up as separate lights in the Hue app. This is pretty normal for Hue though: lights can be grouped and controlled together and this model works well, so even if it might be more expensive it’s a reasonable approach if you need it.
Here’s the wiring diagram I posted on top of the cabinets next to the wiring for my installation. Nothing’s perfect, so I left the warts unhidden here: I ran out of black/red/white three-core cable so had to switch colours partway through, and I also re-used a mains cable as a 24V supply since I couldn’t re-pull more obvious cables through and felt that buying a separate transformer and controller just to avoid this wasn’t worth it.
Physical installation
In my case, the physical installation wasn’t particularly tricky. I turned off the old downlighting, checked it wasn’t live, and removed it. I was able to do this in stages — having a young child limits how much time you get to work at once on these things! — by temporarily powering the transformer for the partially-installed new lights from the splitter that was part of the original installation, alongside the remaining old light fittings. The old fittings were screwed onto the bottom of the cabinets, and I was able to reuse the screw holes for the clips that hold up the aluminium profile that houses the new strips.
Wiring
There are friction-fit connectors that you can use to wire up the strips, or do as I did and simply solder the wires onto the pads. I’m not new to soldering, but I did have to remember some tips from the years ago when I last did it: heat up the pad and feed the solder onto it, use enough solder but not so much it bridges to another connector (I was using a particularly fine reel of solder intended for surface-mount work, so was prone to using too little), twist the strands of wire tightly together by grabbing it at the very end and rotating it, add solder to both the pad and wire before re-heating the pad and joining the two to tack it into place and, finally, check your connections using your multi-meter’s audible continuity testing feature.
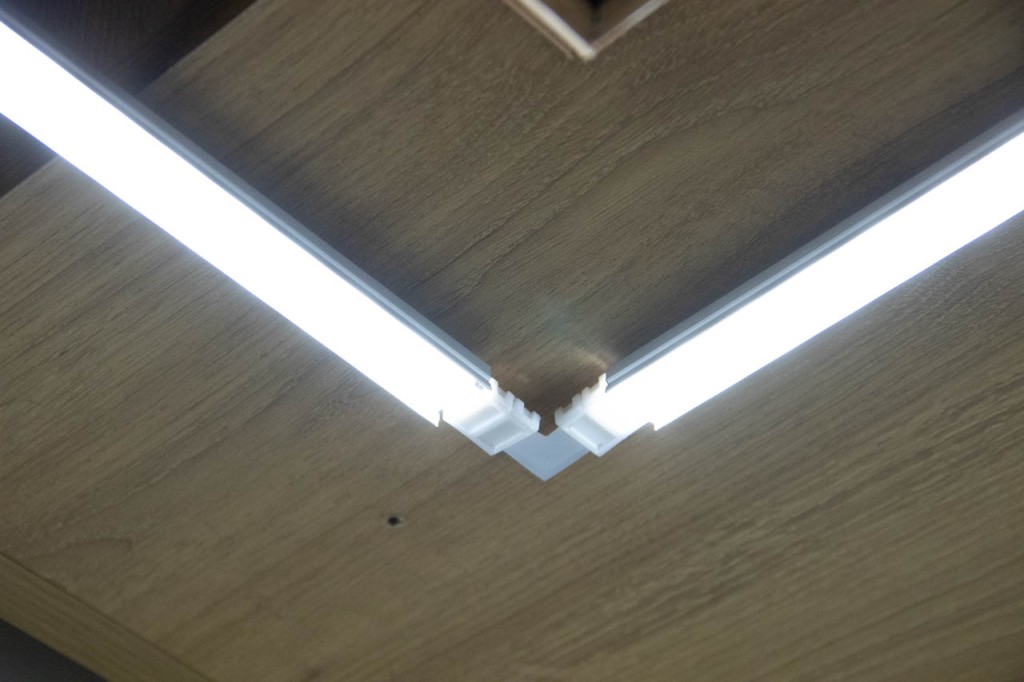
I had a corner to deal with, and decided to use a corner-connector to get a very tight, clean connection rather than attempting to solder wires at 90º. This worked well although the connector did not fit into the aluminium profile I had, so to fit it I had to first measure and cut the tape, connect it at right angles, solder the wire connection onto one side, and then finally remove the backing tape and stick it onto the aluminium profiles held at a right angle. I assembled the two pieces before installing it into the retention clips. Determining the lengths of these strips and getting the profiles cut to the right length seemed daunting initially, but was pretty easy once I realised that I had around 5cm wiggle-room on length, and that the position (depth into the cabinet) was already determined since I was using the existing screw-holes cut for the previous fixtures.
Housing
I used the adhesive tape on the LED strip to fit it into aluminium profile. This has a diffuse plastic cover that can be applied to reduce the appearance of spotting; it also helps to remove some harsh shadows from the edges of the LEDs. I was originally concerned that fitting the strip into the profile might reduce the angle of light emitted, but it turned out not to be a problem. The profile and covering can be cut easily using a hacksaw.
Don’t forget, like I did, that the aluminium profile is conductive, so make sure you tape over your contacts before test fitting the strips. Luckily, the controller had overcurrent protection so shorting it didn’t cause any permanent damage.
ZigBee controller
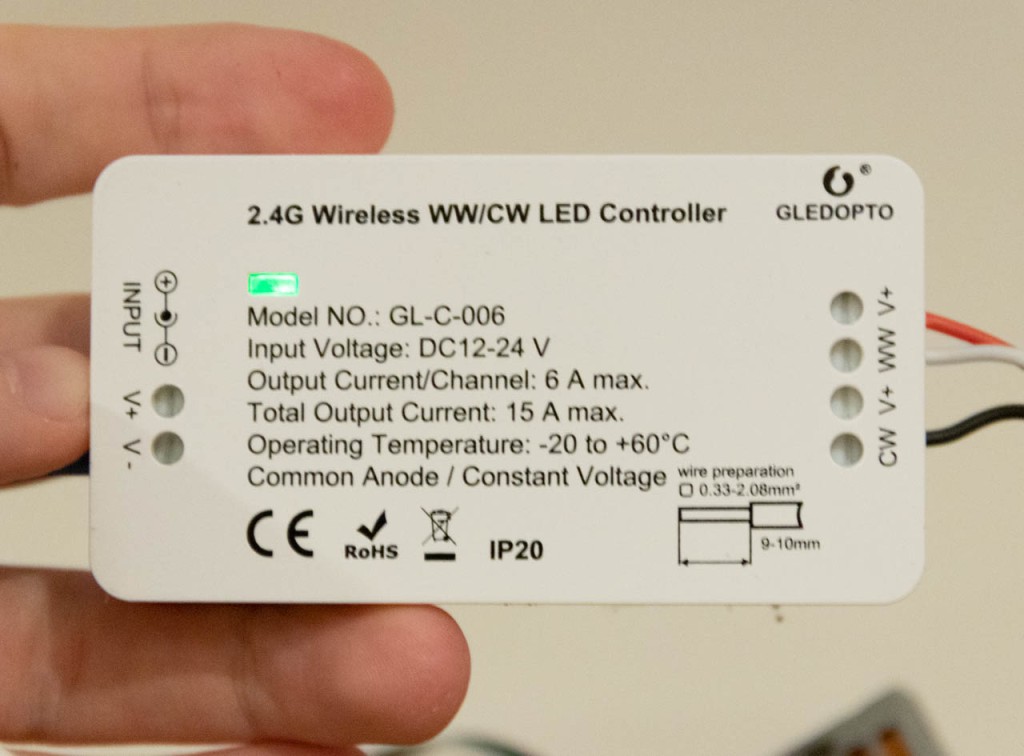
The ZigBee controller I used is the Gledopto WW/CW controller. It integrates well with Phillips Hue and works pretty flawlessly in the app. As mentioned above, it doesn’t support an ‘on startup’ setting, but other than it’s no different than the other Hue lights I own.
Parts and tools
Here’s a list of parts I used:
- Adjustable white LED strip
- ZigBee controller
- Power supply
- Aluminium profile
- Corner pieces
- Wago connectors
- 3-core 0.5mm2 cable
- Solder
- Electrical tape to cover soldered ends
Tools you will probably need include:
- Wire strippers and cutters
- Soldering iron/station
- Hacksaw to cut the aluminium profile
Conclusion
Overall, this was a fairly simple, fun project and is an improvement over the previous lighting setup in the kitchen. The main thing I’d consider doing differently is to consider a brighter LED strip, but other than that it’s working nicely.
Thanks for reading! I hope this was helpful if you’re considering a similar project. If you have questions or want to learn about my future projects, follow me on Twitter for more.
