Investigating Google Sign-In led me down a rabbit hole of trying to understand authentication with Google, how it fits with standards such as OpenID Connect (OIDC) and OAuth 2.0, and how best to integrate it into a web app that has a JavaScript frontend and backend API. This article is the result of that research.
On the face of it, integrating with Google Sign-In is trivial: there’s a Google page that tells you how to do it. But I believe in understanding the tools you’re using rather than just pasting code from random websites, especially when it comes to security-related functions. I wanted to understand what was happening under the hood and be sure that I wasn’t inadvertently introducing security holes into my app. So I created a simple sample app that has just enough function to demonstrate how to safely integrate sign-in to your app.
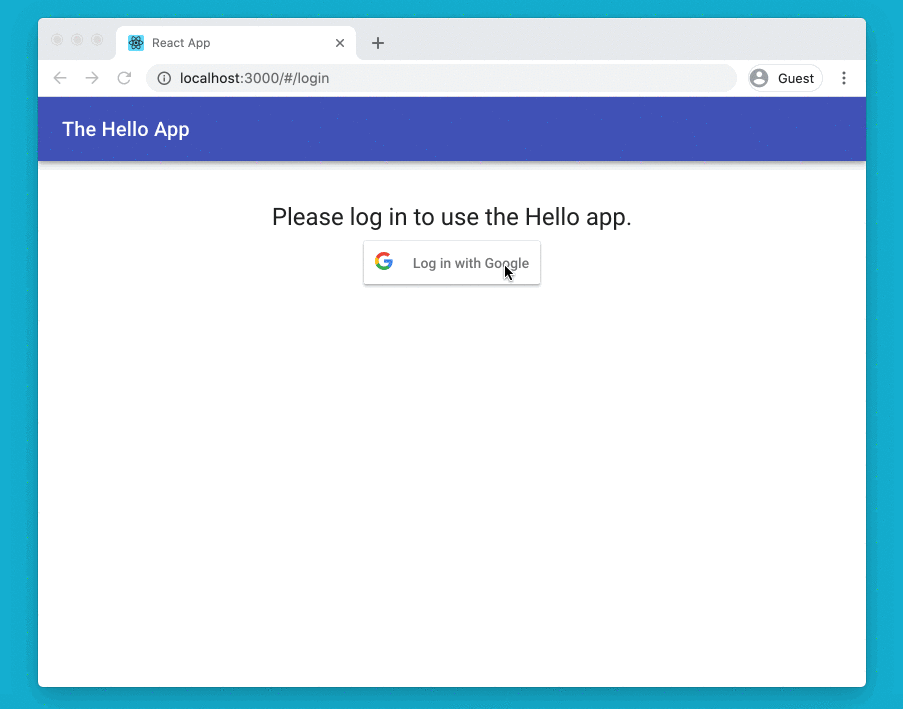
Check out the sample Hello app on Github that demonstrates the topics discussed in this article.
The app
The demo Hello app is a React-based web app that talks to an API assumed to be in the same domain. The app that led me to start this work — the BoilerIO open source heating controller — is very similar: it is close to a single-page app (I’d say it is one, but the definition of an SPA is a bit vague so I’m going to avoid absolutes here) with a JavaScript (React) frontend, and an API it interacts with (intended to be hosted in the same domain) written in Python using flask. The goal is to add login to the app using Google Sign-In.
In the BoilerIO app I wanted to restrict login to a set of known people, authorised by an administrator, but this probably isn’t the common case so I’ve not included that in the sample Hello app.
When to use this approach
Authentication and authorisation can get complex when your application needs to deal with multiple identity providers, and even more so when you’re dealing with non-cloud identities. The scenario we’re dealing with is one of the simplest: a single, cloud-based identity provider aimed at consumers (“social sign-in”). If you have a more complicated scenario — your own username/passwords, multiple providers (Google Sign-in, Login with Amazon, Facebook, etc.), or enterprise directory services (e.g. Active Directory) then it gets a whole lot more complicated and you might instead use a service like Amazon Cognito or Auth0 to do the hard work.
This doc is about Sign-In specifically: you might also want to get authorization to use resources that the user owns in the third-party domain, for example getting access to their Google Drive or Calendar for use within your application. There are additional considerations in this case around security of the tokens and choosing the right flow for your application that aren’t covered here.
We’re using the Google SDK to do sign-in, with a lightweight wrapper in the form of the react-google-login frontend library. This is a good choice if you want just Google Sign-In. If you want to support multiple providers then you could still go this route (other service providers such as Facebook have their own SDKs too), or you could use a service that gives you multiple options via a single interface (such as Cognito mentioned above), or use a generic OpenID Connect implementation for the providers that support it. Using the SDKs removes some complexity and therefore (hopefully) security risk from your implementation.
How does Google Sign-In work?
Google Sign-In via the SDK is built on Google’s OpenID Connect (OIDC) implementation. It uses extensions to this, the so-called “Identity Provider (IdP) IFrame”, so some of the recommendations for securely implementing OIDC don’t apply directly. The “IdP IFrame” mechanism was described in a draft RFC published to the OIDC mailing list, but I wasn’t able to find any follow-up to this, and it’s likely that the implementation has progressed since that draft was published.
The SDK provides a signIn method that you can call as well as a way to generate a button the user can click on that is equivalent to calling this method. This initiates a user flow that, by default, pops up a window to allow the user to authenticate to Google. This will ask them to give permission to your application for the “scopes” you have requested if they haven’t already provided this permission before. Scopes are the things that you are requesting access to; in the Google console you can select which scopes your credentials are allowed to be used for, and you should pick the smallest set possible. For a sign-in use case, you only need to ask for “openid”, “profile”, and “email”. You could also get access to the user’s Drive contents, Calendar, or other resources, by adding appropriate scopes here.
Once the user completes the sign-in process your application will receive back an access token, a refresh token (if the “offline” type was selected), and an ID token. The ID token is a JSON Web Token (JWT) that contains claims about the user’s identity. Your API must validate this (since a malicious user could easily inject a fake JWT) and then it can be used as proof of the user’s identity. Within your app, you can treat this a bit like a correct username and password.
The other tokens aren’t as relevant for sign-in/authentication use cases. You can use the access token to access Google resources belonging to the user in the scopes that you requested. If you only specified the limited scopes suggested above, this will give you access to the userinfo endpoint, which can be used to obtain information about the user the access token was generated for. The information this provides is a subset of that in the ID token you already received. All of these token have an expiry, but the refresh token has a longer expiry than the others (typically) and can be used to get new tokens.
The client-side Google code for the SDK is closed-source (or, at least, I couldn’t find the source) so it’s hard to say exactly what it’s doing, my guess is it’s using a grant similar to the Implicit OAuth grant, but with some additional security bought by use of its own code within the IFrame and the way it gets the credentials to the calling application (using HTML5 local storage as a relay between the Google-originated IFrame/authentication popup and the client application, rather than via a redirect as would be used in plain OAuth 2.0).
Adding Google Sign-In to your application
When adding authentication to your application, you’ll need to:
- Create OAuth credentials in the Google API console (since this is used in the Sign-In process).
- Add
flask-login to your app to manage user sessions.
- Add authorization checks to your existing service endpoints.
- Implement some way of storing users and representing them, and then link this with
flask-login. Typically this would be in a database.
- Implement endpoints to log users in and out and to provide information about the user to your frontend/client.
- Modify your frontend/client(s) to check for 401 (Unauthorized) responses from your server, and offer the option to log-in when these are received.
- Add a login page to your frontend application.
We’ll go through each of these in turn, and each section will cover in more detail what you need to do along with pointers to the sample Hello application.
Creating OAuth Credentials for your service
What do I need to do?
- Go to the Google API console and create OAuth credentials for your app. You can choose the “Web app” option when creating the credentials. You’ll also need to configure your “Consent screen” if it’s the first time you’ve done this.
- You only need the Client ID when using the Google Sign-In SDK: expose this through configuration to your frontend and backend.
In the Hello app: The Client ID is exposed through the GOOGLE_CLIENT_ID configuration entry in the Flask backend. We use Flask’s standard configuration support to load configuration from a Python file named in the environment (HELLO_CONFIG). Although it’s not a “secret” the client ID is still better handled through configuration than being checked into the code. In the React application, we use an environment variable (REACT_APP_GOOGLE_CLIENT_ID) in the .env file. This is built into the distribution at build-time and visible to clients.
The Google Sign-In SDK uses OAuth under the hood, and you need to pass it an OAuth Client ID for your application. You can create this as in the Google APIs console. Some of the choices available when doing so are:
- Application type: Google limits what can be done from certain client IDs, for example which OAuth 2 flows (implicit grant, authorization code) can be used. You should select “Web client” here. It’d be nice to see Google publish more details about what these choices allow/disallow; for example, for a website with a backend it might provide more security if you could require that the auth-code flow is used.
- Authorized JavaScript Origins: These restrict where Google’s authentication flow can be initiated from. You should put any origins that you host your site from, including localhost for testing, here. You’ll need to provide the full origin including protocol, hostname, and port.
- Authorized redirect URLs: Leave this blank. In a normal OAuth flow, the identity provider uses a redirect back to your site to get credentials to you (the access/refresh token). When you’re using this Google Sign-In SDK, this happens outside your application using the
storagerelay URI scheme, so there is no redirect back to your site. As a side-note: If you step outside the sign-in flow discussed here and use OIDC directly with the Auth Code grant type then, if you’re getting your token from the token endpoint, you need to specify the same redirect_uri parameter in both calls (for the code and the token) and you might want to set this to postmessage rather than an actual URI if you’re getting the tokens from the token endpoint rather than a redirect.
As an aside, localhost is a valid option for the URLs above if you’re using a standard OIDC/OAuth flow rather than the Sign-In SDK because the redirect is handled by the user’s local browser and so localhost refers to the user’s host in that context. You will want to include that when testing your service locally.
If you make changes to your OAuth credentials (such as adding a new authorized JavaScript origin) it can take several minutes (sometimes over an hour) for this to propagate to Google’s servers, so be mindful of this when testing updates to settings.
Adding authorization to your service
What do I need to do?
- Add
flask-login as a dependency to your application (using pip install or pipenv if you are using this for package management).
- Add the
login_required decorator to all methods that should require the user to be logged in.
- Create a secret key for your app to use when signing sessions.
In the Hello app: The flask-login dependency is in the Pipenv file. In app.py we instantiate a LoginManager at the start. The secret key is part of the configuration.
For a single-page app on the same domain, the flask-login extension to Flask helps you to implement session handling in your backend. Flask-login lets you implement your own logic to authenticate a user, but does the work of managing the session and cookies for you.
You will provide a “login” endpoint that validates the credentials provided and sets a session cookie (using the login_user method provided by flask-login). This cookie is then passed on each subsequent request, validated by the flask framework for you, decoded to determine the currently logged-in user, and the user information is available to your application code via the flask.current_user variable. You can also decorate your endpoints with the @login_required function to ensure that only logged-in users can access them.
You can treat a valid ID token from the identity provider as equivalent to a username and password: your “login” endpoint takes this ID token, validates it, and logs the user in if it is valid.
Flask sessions include a message authentication code so are tamper-proof, but are not encrypted (see the documentation). They’re also stateless, so there shouldn’t be any concern around horizontal scaling of your service. Flask by default (as of writing) uses the HMAC-SHA1 algorithm, so a key length of at least 160 bits (20 bytes) is desirable. As noted in the Flask documentation, you should generate this from the os.random function. To improve security, we set “session protection” to “strong” in the login manager, which prevents the session cookie from being used on a different host, and set the “Remember me” cookie to have the HttpOnly flag so it can’t be read by client JavaScript code. You could also add the “secure” flag to these two cookies, so that they are only sent over HTTPS (and not HTTP) – you could consider doing this in your production configuration but not in the testing configuration to make development easier. Setting HttpOnly prevents code on the client accessing (and therefore potentially leaking) the session token.
Why not use JSON Web Tokens (JWTs)/bearer tokens, passed via the Authorization header on each request? Doing so is actually pretty similar to the sessions approach described above, except that a JWT is used and passed in a different HTTP header: both are tamper-proof, unencrypted, encoded blobs of data. The origin of the JWT could be your application (generated in your login method, then passed by the client on subsequent API calls) or the JWT given to your application by the identity provider. This method isn’t the recommended one because, in the case of handling your own JWTs there’s no advantage over using Flask’s built-in session support, and it has the disadvantage of requiring additional code or dependencies in your application. Because JWTs can be large and need to be passed in the Authorization header, you can’t store them in an HttpOnly cookie and your client code has to handle them. In the case of using the Identity Provider’s (Google’s) ID token (which is a JWT), the main issue would be that this is short-lived so you’d have to call the Google Sign-In SDK again to get a new token.
Managing users
What do I need to do?
- Implement a way to store and retrieve user information, “user loader” (a method that looks up a user by ID, called by the flask-login code), and “User” class with at least an ID attribute.
- You’ll also need a way to log users in: see the next section for more information.
In the Hello app: The UserManager class in the Hello API implementation is a trivial in-memory store of users. It’s keyed by Google Subscriber ID: In your application it is probably better to store a synthetic primary key as a user ID and use this to identify users. This gives you flexibility later to add other authentication providers.
The load_user method is decorated with the LoginManager instance’s user_loader and does a lookup of the user ID passed to it. This will be called when a valid session cookie is received containing the logged-in user ID to get the full User object back.
The User class uses the UserMixin to provide basic requirements; note that you must implement an id property.
Typically you’ll have one or more database tables to represent users. It’s worth considering that you might want to allow the same user to sign in with different providers or credentials in future (username/password, Login with Facebook, Login with Amazon, Google Sign-In, etc.). Each provider will give you a “subscriber ID” (the sub field in the identity token) as part of the user’s identity that is guaranteed to be unique for that identity provider (see the OIDC standard, which says that the subject identifier is a “Locally unique and never reassigned identifier within the Issuer for the End-User, which is intended to be consumed by the Client.”). So, a simple solution could be a column per ID provider. The article Merging multiple user accounts by Patrycja Dybka suggests a more sophisticated alternative, based on what the StackOverflow site does, using a separate table to store the user identities, as well as discussing how this could be presented to the user.
You should consider how to deal with users logging in using the Google Sign-In feature that have not used your site before. The Hello app example doesn’t deal with this, but you could return a value to your client to indicate that additional user information is required in this case if needed.
Implement “login”/”logout” endpoints for your backend
What do I need to do?
- Extend your API to facilitate login/out. You could consider using the
google_token module provided in the Hello app to do your token validation.
In the Hello app: We expose a single endpoint (/me) which has a POST method to log in using an ID token, a GET method to retrieve information about the currently logged-in user, and a DELETE method to log the user out.
To validate the ID token, we provide a convenience method that calls the Google Python SDK: this is a trivial wrapper that creates a CachedSession object that the SDK will use to make outgoing HTTP requests. By using the cachecontrol library here we honour the HTTP headers when implementing our cache (so that, for example, Google’s key rotation will not cause our logins to fail, but also we don’t cause outbound traffic to scale with calls to our login function).
The login endpoint validates the user credentials (the ID token provided by the Google Sign-In process) and either logs the user in (sets session cookie by calling the LoginManager’s login_user method) or returns an error (403 Forbidden).
To validate the signed ID token, a number of checks must be made. This is all done for you through the Google SDK. The Hello app has a convenience method you could copy in the google_token module that deals with caching outgoing HTTP requests. The checks in summary are (i) validate the signature using Google’s public keys (which need to be fetched from the correct Google location), (ii) check that token has not expired, and (iii) check that the token was intended for your application (so that a token intended for another application cannot be injected). You can find out more about these checks in the Google documentation.
Adding a login page to your client
What do I need to do?
- Import the Google Sign-In SDK. In our React app, we’re using the
react-google-login npm package.
- Implement a login page.
- Redirect to the login page when you get Forbidden responses to API calls on the client
In the Hello app: We use the react-google-login package. The main page uses a HashRouter to implement navigation between pages of the app. There are two pages: the main “Hello” page and the “Login” page. We implemented the ProtectedRoute component to encapsulate logic to redirect to the login page if the user needs to authenticate. In the main app we also use an AppBar with a profile icon that the user can click to log out, to demonstrate using information from the user’s profile.
Once you’ve implemented authentication on your service, modifying the client to authenticate should be relatively easy: in React we do this by keeping some state that indicates whether the user needs to be authenticated. When an API request fails with an error indication lack of authorization, this state is updated indicate that authentication is required. When authentication is required, we render any “protected” pages as redirects back to the login page.
Similarly, if the user is authenticated already we redirect to the homepage. Some clients would take a slightly more sophisticated approach by keeping track of which page to return to after authentication is complete. If you’re doing this be careful not to introduce open redirect bugs (see the OWASP cheat sheet on Unvalidated Redirects and Forwards for more info).
The login page itself includes the Google Sign-In button, and a handler to send the ID token we get handed to our backend for validation and to sign the user in.
Add cross-site request forgery (CSRF) protection
What do I need to do?
- Any mutating operations need to be protected with a CSRF check: a simple option is to use the X-Requested-With header.
In the Hello app: The Hello frontend app adds X-Requested-With as a default header sent by Axios. In the backend, the csrf_protection function in app.py checks for the header and returns HTTP 403 (Forbidden) if it does not exist, and all mutating operations are decorated with this check.
Unless the target host explicitly allows it, browsers will block cross-origin requests as part of their cross-origin resource sharing (CORS) checks. However, in cases such as POSTs, the call to the server is actually still made, but the result of the call is not available to the client. This means that an attacker hosting a random site could use your authenticated session (via the session cookie) to call your API and make side-effecting requests despite the cross-origin request protection provided by modern browsers. This behaviour is described in this excellent article: CSRF Mitigation for AJAX Requests, along with the mitigation suggested.
Adding the X-Requested-With header prevents the browser from making the cross-origin request (since this header is not allowed to be sent across origins by default) without doing pre-flight checks first. The response should indicate that the call isn’t allowed and it will be blocked. Adding the header is easy with axios:
axios.defaults.headers.common['X-Requested-With'] = 'XmlHttpRequest'
And to check for it in Python you can decorate your request handler with this:
def csrf_protection(fn):
    """Require that the X-Requested-With header is present."""
    def protected(*args):
        if 'X-Requested-With' in request.headers:
            return fn(*args)
        else:
            return "X-Requested-With header missing", HTTPStatus.FORBIDDEN
    return protected
How secure is this?
It depends if social sign-ins meet your application’s requirements. If implemented correctly, then this flow can authenticate a user and give you similar confidence to that user entering a password that they are who they say they are. But, you don’t control the sign-in flow so you’re relying on the policies of the identity provider (such as when password re-entry is required).
Using a scheme like this instead of a username/password system means you don’t have the risks associated with password management (making sure to use an appropriate hashing schemes for example). Even still, you’re almost certainly storing sensitive information so you need to handle it accordingly.
Social sign-ins such as Google implement features such as two-factor authentication, which can increase the security of the sign-in.
When using social sign-in, the “fresh login” feature of flask-login looks somewhat questionable: often, after initial consent to allow login to your app, even logging out and then back in won’t require the user to enter their Google password as they are still logged in with Google.
Ultimately, when using social sign-in you’re not really in control of session policies since a new login can often be started without a password being entered. For sites where this is unacceptable (you probably wouldn’t want your bank doing this, for instance) you’ll have to use an alternative. For many sites it is good enough though: you’re protecting your application on the same basis as the user’s GMail account, which is often a high value asset.
Some (partial) gory details
OAuth 2 and OpenID Connect
There are various versions of the OAuth and OpenID standards, but the relevant ones are OAuth 2.0 and OpenID Connect.
OAuth 2.0 is a standard to enable authorization of users on third party sites (or the sites themselves) against resources on a different service: e.g. my heating app to access a user’s Google Calendar on behalf of that user. On it’s own it doesn’t provide for authentication, but simply provides a process where a user authenticates to a third-party identity provider and allow an application access to the resources belonging to them on that site.
OpenID Connect builds on top of the OAuth 2.0 flow by specifying details of how particular flows work and what certain values that are returned as part of the flow should look like, in particular that an ID token is provided that can be validated as authentic. This does allow for authentication of a user to your application by having them sign into a third-party identity provider such as their Google account.
In writing this article and implementation I found a lot of confusion about how these standard protocols relate to the Google Sign-In SDK. I had assumed the Google Sign-In API provided was a simple helper to use OpenID Connect in your application (which isn’t exactly true), and therefore recommendations for the latter were relevant. However, the SDK actually implements a customised authentication flow that extends OIDC and that relieves the developer of some aspects of the security implementation (such as ensuring that there is a unique and tracked state parameter in their authorization requests).
The IdP IFrame and storagerelay
Google’s Sign-In JavaScript SDK uses an iframe that is added to your site where Google pages are loaded to help with authentication. There was a draft standard published for this method that I found when trying to understand why a redirect URI starting “storagerelay:” was being used. This was published by Google engineers to an OpenID list here: http://lists.openid.net/pipermail/openid-specs-ab/Week-of-Mon-20151116/005865.html. The iframe uses HTML5 local storage and storage events to communicate status back to your application, allowing it to use Google-controlled pages to complete the authentication without redirecting back to your site in the traditional way.
It’d be great to have more details of the implementation of the Google SDK to include in this section to be able to better understand how the security concerns compare with using one of the standard OAuth grant types, what to do if you only need identity, and how to safely avoid tokens getting onto the client. The SDK does support the authorization code flow (which allows for this) but as far as I can see you can’t stop the non-auth-code flow being used. Even though the main risk regarding token leakage through browser history is addressed through the IdP IFrame implementation, this isn’t well documented as far as I could find and it would seem safer to be able to prevent clients receiving tokens directly through configuration. This is especially true if you’re using scopes beyond just ID. The OAuth2 website describes the different grant types available: https://oauth.net/2/.
Conclusion
This article covers a holistic view of integrating Sign-In with Google to your website and hopefully gives you the confidence to do so safely.
I’m keen to make sure the content here is accurate, and that the Hello app example is secure and good quality, so please do provide comments or share pull requests if you see any areas for improvement.
Links
Check out the Hello demo app on Github that implements everything described in this article.
Google Sign-In related, and packages used in this project:
OAuth and OpenID Connect related documentation:
And finally:
- Not the Google API JavaScript Client on github. This repository has a promising sounding name, but is just documentation with a placeholder
main.js file, sadly.


 As we have two floors in our house I wanted to control them independently. In the first year of running boilerio, I only controlled the ground floor heating and used our existing system for the first floor. Since implementing support for two zones, I controlled both floors of our house with no major issues for the whole of last winter.
Much of the changes were fairly mechanistic; one key decision was how to change the schedule representation. The minimum to get this working would be to have two instances of the controller running with separate databases, etc. A step up could have been to have two clients running against a single server with the schedules represented separately; this is probably a classic microservices design. One disadvantage would be that it’s harder to co-ordinate between the clients for features like timing the on/off cycles of the multiple zones to be out of phase to reduce load on the boiler.
In the end I added zone IDs to entries in the schedule table that refers back to a new “zones” table where that zone is given a name and the temperature sensor ID that it uses. This implies a 1:1 relationship between control zones and sensors, which could easily be improved upon in future. The existing
As we have two floors in our house I wanted to control them independently. In the first year of running boilerio, I only controlled the ground floor heating and used our existing system for the first floor. Since implementing support for two zones, I controlled both floors of our house with no major issues for the whole of last winter.
Much of the changes were fairly mechanistic; one key decision was how to change the schedule representation. The minimum to get this working would be to have two instances of the controller running with separate databases, etc. A step up could have been to have two clients running against a single server with the schedules represented separately; this is probably a classic microservices design. One disadvantage would be that it’s harder to co-ordinate between the clients for features like timing the on/off cycles of the multiple zones to be out of phase to reduce load on the boiler.
In the end I added zone IDs to entries in the schedule table that refers back to a new “zones” table where that zone is given a name and the temperature sensor ID that it uses. This implies a 1:1 relationship between control zones and sensors, which could easily be improved upon in future. The existing  I wanted a similar feature to Nest whereby the heating is turned on before the requested time in order to reach the desired temperature by the requested time. The starting point for this has been to add predictions that are shown in the UI as to how long it will take to get to the current target.
The current implementation was good to learn from but probably needs to be changed. There is a separate program,
I wanted a similar feature to Nest whereby the heating is turned on before the requested time in order to reach the desired temperature by the requested time. The starting point for this has been to add predictions that are shown in the UI as to how long it will take to get to the current target.
The current implementation was good to learn from but probably needs to be changed. There is a separate program, 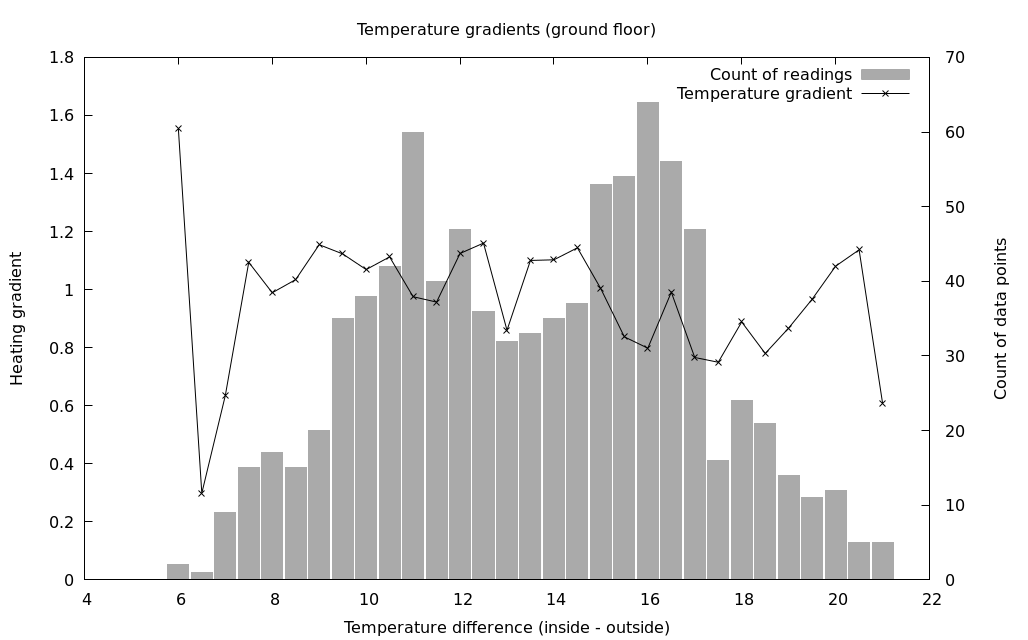 Was it worth it? The graph above shows a visual representation after running the system with measurements being recorded over one winter. The line is the temperature gradient at a particular temperature difference, and the bar shows how many readings went into that aggregate value (so you can see we can probably safely ignore the outermost data points as not having enough input data). I think it’s not totally clear; the definitely does seem to be a downward trend in the heating rate as the temperature difference increases, but there’s also some upward spikes including at the highest temperature differences. However, there are several confounding factors:
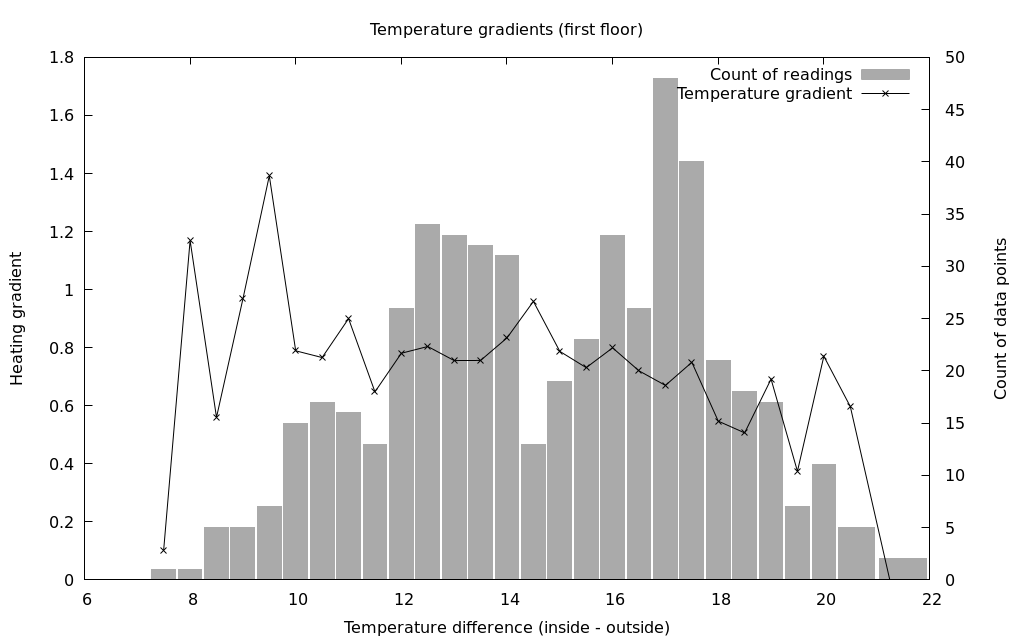 Although I knew it going into implementing this gradients API, a better (if more time consuming to implement) method would be to actually record the time-series data for temperature and boiler on/off over time. This way, it would be possibly to try out different algorithms on historical data, and also the logic as to what data to record would be moved off the client. Luckily this is also quite a neat UI feature too, so is appealing as a next step for development.
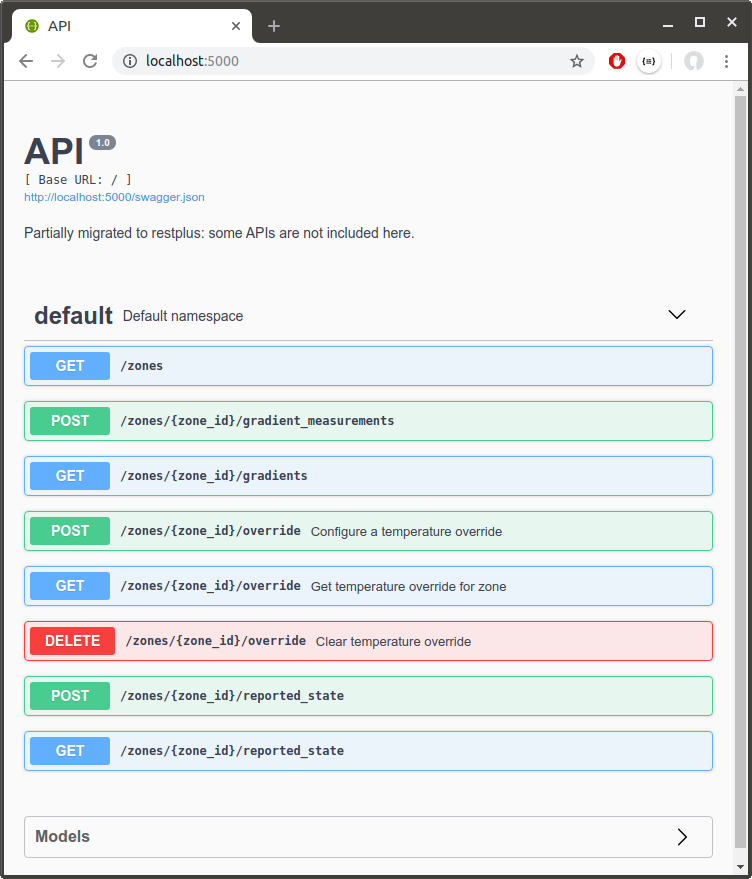 One of the annoying things about this is that it doesn’t work well when hosted on a proxy server not at the root. There’s a few threads about this issue online but no pleasant solution that I’ve found: I don’t want to have to modify the application to know its actual root, and I don’t want to modify the proxy configuration to know the app uses Swagger ideally (maybe that’s the better option). I think there’s still room for someone to figure out a good solution here.
There’s still work to do; I moved some of the
One of the annoying things about this is that it doesn’t work well when hosted on a proxy server not at the root. There’s a few threads about this issue online but no pleasant solution that I’ve found: I don’t want to have to modify the application to know its actual root, and I don’t want to modify the proxy configuration to know the app uses Swagger ideally (maybe that’s the better option). I think there’s still room for someone to figure out a good solution here.
There’s still work to do; I moved some of the 