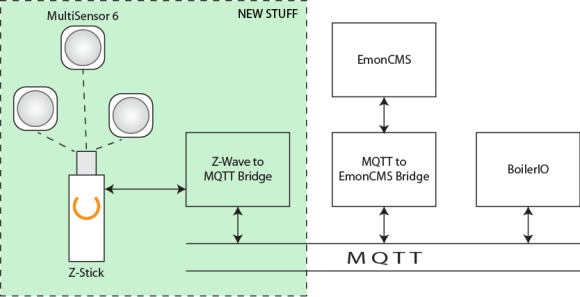
Having recently acquired a couple of Aeotec MultiSensor 6 devices, I decided to investigate how to make them easy to use via MQTT so I could use them from BoilerIO (my IoT heating control) and EmonCMS (the energy/home monitoring system from OpenEnergyMonitor.org).
In this article I present the beginnings of a Z-Wave to MQTT bridge as well as discuss the basics of Z-Wave to help you get started with it.
If you want to get straight to the code, jump to the section on the MQTT bridge, check out the code on Github, or run pip install zwave-mqtt-bridge.
Z-Wave Concepts
A number of nodes (up to 256) can form a Z-Wave network. The network can have one or more controllers, with at least one primary controller. The primary controller has a Home ID that identifies the network, and assigns Node IDs to nodes as they join (are “included”) in the network.
Nodes have a product type that defines their behaviour. The Z-Wave specification lists a number of command classes that are required and optional for particular product types; these command classes specify a set of commands (with parameters) that a device must implement. For example, the “multilevel sensor” command class, number 0x31, defines a multilevel sensor report command, which is used by a device to advertise sensor readings. It contains fields to indicate the scale, unit, and size of the data followed by the actual data itself.
Communication is asynchronous, and applications are generally built in an event-driven way as a result. For example, sending a “Get” command to retrieve a sensor reading value may later result in a report command being sent back. However, devices may be battery operated and not awake at the time readings or configuration changes are requested, so the application cannot simply wait for responses before continuing; the controller should deal with retransmission at the correct time for you.
“Association groups” allow nodes to communicate and send events to each other. This is how, for example, a light switch and an associated bulb might be configured so that when the switch is pressed the bulb is notified and toggles its state. Devices are required to have at least one notification group, the lifeline notification group, that includes the primary controller and is established when the device is included into the network. The Z-Wave standard also imposes requirements on the commands sent to this association group, e.g. multilevel sensors are required to periodically send a report to the lifeline association group with their readings.
Hardware

The Aeon Labs Z-Stick and the Aeon Labs MultiSensor 6 are the two main devices used throughout this article.
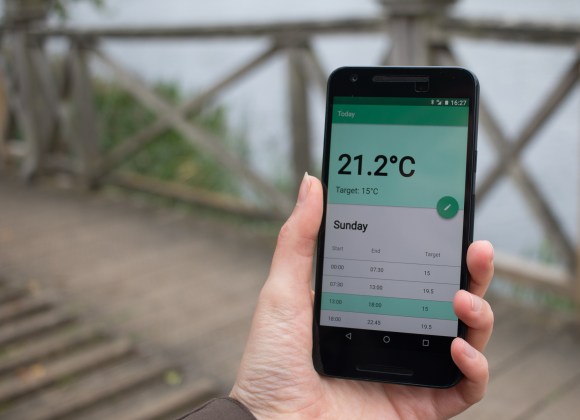
The MultiSensor 6 provides temperature and various other sensor values over the Z-Wave network, and is powered either from USB or up to two CR123 batteries. One interesting feature for future BoilerIO work is the motion and luminance sensors, which could be used to indicate presence. Lower precision temperature reporting, relatively infrequent reporting when on battery, and proprietary firmware and hardware designs are downsides compared with the EmonTH I’ve been using so far.
The Z-Stick is s static controller that exposes a serial API (the “Zensys API”) for which there seems to be little public documentation (and the reply from the Z-Wave alliance to this post suggests that there is no intention to make this information public). The OpenZWave project has reverse-engineered this protocol and has a list of supported controllers (of which the Aeotec Z-Stick is one). If you are going to do a similar project then it’s worth checking the controller you plan to buy is on that list.
OpenZWave and python-openzwave
The OpenZWave project provides a way for developers to write applications that can interact with a Z-Wave network using a PC-based controller such as the Z-Stick mentioned above. OpenZWave is written in C++, and so we are using python-openazwave which is a set of Python bindings to OpenZWave. OpenZWave is used in some significant home automation projects such as openHAB and Domoticz to interface with Z-Wave devices.
Installing python-openzwave on the Raspberry Pi
Grab a copy of the python-openzwave repository from github:
$ git clone https://github.com/OpenZWave/python-openzwave
This checks out the master branch, which is ‘unsupported’ and in development, so you may want to switch to a release branch such as v0.3.3 and install dependencies, build, and install it like so:
$ sudo apt-get update && sudo apt-get install libudev-dev
$ cd python-openzwave
$ git checkout v0.3.3
$ git submodule update --init
$ make build
$ sudo make install
This can take quite some time on a Raspberry Pi since it involves downloading and building OpenZWave.
The Aeon Z Stick has a built in battery and can operate either as a standalone controller with a serial interface when it is plugged into your USB port, or in inclusion/exclusion mode when not plugged in. Assuming the device is plugged in, you should get a serial port that you can use to communicate with it; on my system this is /dev/ttyACM0 but the number at the end may differ.

ozwsh so you can pass in their location on the command line. To start the shell, run:
$ ozwsh -d/dev/ttyACM0 -c/usr/local/lib/python2.7/dist-packages/python_openzwave/ozw_config/
Some quirks to be aware of: You can use TAB to move between panes and therefore get access to scrolling on the main window. You can’t cd to paths, only to “directories” in the current level. The hierarchical layout that the tools presents makes sense but is an abstraction and doesn’t really represent how the Z-Wave network actually works. The utility was renamed to py_ozwsh in version 0.4 and higher of python-openzwave.
Z-Wave Bridge to MQTT (and EmonCMS)
I wrote a simple Z-Wave to MQTT bridge that interfaces between Z-Wave and MQTT, and tested it with the MultiSensor 6 (with others coming in future). The goal is to provide a simple and universal service that my (and others’) home automation can interact with. Here are some steps to help you get started with it:
- Install
python-openzwaveas above. Note that this is not available on PyPI so isn’t automatically installed via thepipcommand below. - Install the Z-Wave MQTT bridge: you can install this via
pipor from the repository on github; for examplepip install zwave-mqtt-bridge. (At the time of writing this depends on theboileriopackage just for configuration file parsing but that should go away soon.) - Create a configuration file,
/etc/sensors/config, to specify your MQTT server and the base topic path to publish to. See the README.md file for an example of a skeleton configuration file. - Run the binary:
$ zwave_mqtt_bridge.
Once you’ve done this, you can use the moquitto_sub tool to see the messages that are being published, for example:
$ mosquitto_sub -h (host) -u (username) -P (password) \
                -v -t emon_sensors/\#
emon_sensors/ZWaveNode6 {"temperature": 19.299999237060547}
emon_sensors/ZWaveNode6 {"humidity": 52.0}
emon_sensors/ZWaveNode6 {"luminance": 11.0}
emon_sensors/ZWaveNode6 {"ultraviolet": 0.0}
...
You can follow the instructions in the README to have the ZWave bridge start from systemd and run as an unprivileged user.

To get this to work with EmonCMS, you need to post to EmonCMS when messages are published to the configured MQTT topics. I wrote a simple Python script that you can find in my emonhub fork on github to do this, or you can use the PHP script provided with EmonCMS (though I had issues with it).
How it works: Using Z-Wave from a Python application
The examples that come with python-openzwave show how to initialise your connection to the Z-Wave network. They use a ZWaveOptions object for configuration that exposes functionality from the C++ OpenZWave library: configuration is taken from a number of places including system-wide and per-user options files and the command line. The application can tell OpenZWave the command line it was called with, and OpenZWave will then do common parsing of Z-Wave related options. The application can also set options directly through the object, which is the approach I would suggest:
# Initialise openzwave.
zw_options = ZWaveOption(args.device, user_path=".")
zw_options.set_console_output(False)
zw_options.lock()
network = ZWaveNetwork(zw_options)
network.start()

while network.state != network.STATE_READY:
    time.sleep(1)
Getting sensor readings from the MultiSensor
There are three ways that sensor readings can be obtained from the MultiSensor: via a GET command that specifically requests the value of a sensor, via the reports that the device automatically generates at specified intervals, and similarly via reports generated when sensors crosss thresholds. The latter two options are the best since we don’t want to constantly be requesting reports from the device.
Receiving sensor reports
Python-openzwave uses the louie framework for signalling events within Python. I couldn’t find huge amounts of documentation about this at the time of writing, but it is based on PyDispatch and, for the purposes of receiving events, is pretty simple to use. There is a connect method in the louie.dispatcher module that allows you to connect a Python callable up to a signal indicated by a hashable Python object. By subscribing to the SIGNAL_VALUE signal, your application will be notified when sensor reports are received.
Code similar to the following would connect the listener and print a message with information about what was received whenever an event occurred:
import signal
from louie import dispatcher
from openzwave.network import ZWaveNetwork
from datetime import datetime

# ... network setup code here ...

exit = False
def sigint_handler(signal, frame):
    global exit
    exit = True
signal.signal(signal.SIGINT, sigint_handler)

# Connect to events
def value_updated(network, node, value):
    now = datetime.now().isoformat()
    print "%s: Value updated node_id: <%d>, label <%s> new value <%s> instance %d" % ( now, node.node_id, value.label, str(value.data), value.instance)
dispatcher.connect(value_updated, ZWaveNetwork.SIGNAL_VALUE)

# Loop until we're told to exit:
print "Running: Ctrl+C to exit."
while not exit:
    signal.pause()
dispatcher.disconnect(value_updated, ZWaveNetwork.SIGNAL_VALUE)
One thing to watch out for here is that exceptions are swallowed in the signal handler, so if you get an exception it appears as though your function didn’t complete. As such, it’s worth wrapping the code in your signal handler with try/except.
Values
Python-openzwave stores values (as instances of ZWaveValue) with devices; these are created depending on the command classes and specific configuration information for each device type. They are initialised with default values and when reading them directly they may be out of date or wrong.
This excerpt from the zw100.xml file for the MultiSensor 6 shows a value, the Group 1 reporting interval, being defined with a default of 3600:
...
        type="int" index="111" genre="config"
               label="Group 1 Interval" units="seconds"
               min="1" max="2678400" value="3600">
...
The value="3600" causes the ZWaveValue instance to be initialised with the value of 3600 so if you need to get the actual value being used by the device, you first need to call its refresh method. Your application will then receive a SIGNAL_VALUE notification with the data.
You can also check the is_set property of the ZWaveValue instance to determine whether the value was actually set as a result of a report from the device or it is just the default specified in the config file.
To set the value, simply set its data property to the desired value.
Configuring report interval and type
As part of the configuration command class, the contents and frequency of up to three sets of automatically generated reports can be configured. These are documented in the firmware manual. The relevant configuration parameters are 101-103 for the desired contents of the report (as a bitfield whose values are defined in the firmware spec) and 111-113 for the interval in seconds for group 1 through 3 respectively. When a reporting group’s interval occurs, the MultiSensor sends a report for each parameter requested in the corresponding configuration value.
Note that, when on battery, the MultiSensor cannot send reports at an interval shorter than the wake-up interval, and the minimum wake-up interval is 240 seconds. (This is possibly a problem for use with BoilerIO, but when connected to USB this limitation does not exist.)
As part of our application we want to configure the wake-up and reporting interval appropriately: here is some example code to do that:
# Find wake-up and reporting interval and set to desired value:
for value in network.nodes[node_id].get_values().values():
    if value.label == "Wake-up Interval":
        value.data = 240
    if value.label == "Group 1 Interval":
        value.data = 240
Integration issues
Battery operation with the MultiSensor
When testing the MultiSensor on battery, I noticed an issue that configuration updates weren’t happening when the device was woken up. Looking at the log files, I saw sections like this:
2017-11-11 18:52:52.245 Info, Node006, Received reply to FUNC_ID_ZW_GET_NODE_PROTOCOL_INFO
2017-11-11 18:52:52.245 Info, Node006,   Protocol Info for Node 6:
2017-11-11 18:52:52.245 Info, Node006,     Listening     = true
2017-11-11 18:52:52.245 Info, Node006,     Beaming       = true
2017-11-11 18:52:52.245 Info, Node006,     Routing       = true
2017-11-11 18:52:52.245 Info, Node006,     Max Baud Rate = 40000
2017-11-11 18:52:52.245 Info, Node006,     Version       = 4
2017-11-11 18:52:52.245 Info, Node006,     Security      = false
This indicated that the controller thought the device was a listening device, which is not the case when it is battery-operated, resulting in some features not working correctly. I suspected that this configuration came from the controller because this set of messages was appearing quickly on initialisation, which I confirmed by connecting to the network with the MultiSensor powered down.
To address the issue, I excluded then re-included the device when it was on batteries and it now worked correctly. These are the new, correct, log messages:
2017-11-11 18:52:52.267 Info, Node007, Received reply to FUNC_ID_ZW_GET_NODE_PROTOCOL_INFO
2017-11-11 18:52:52.267 Info, Node007,   Protocol Info for Node 7:
2017-11-11 18:52:52.267 Info, Node007,     Listening     = false
2017-11-11 18:52:52.267 Info, Node007,     Frequent      = false
2017-11-11 18:52:52.267 Info, Node007,     Beaming       = true
2017-11-11 18:52:52.267 Info, Node007,     Routing       = true
2017-11-11 18:52:52.267 Info, Node007,     Max Baud Rate = 40000
2017-11-11 18:52:52.267 Info, Node007,     Version       = 4
2017-11-11 18:52:52.267 Info, Node007,     Security      = false
Device name changes
The Aeon Z-Stick is designed to work as a static controller when plugged into a host PC, but in order to include and exclude device it is necessary to unplug the device from the PC, move it near to the device being included/excluded and press the button. However, unplugging the device will stop the Z-Wave network connection from working and there is nothing in place to restart it when the device is reconnected. Further, the device is not guaranteed to re-appear with the same device name it originally had, and certainly seems not to if file handles to the original device are kept open.
The Z-Stick appears as a modem device, but other devices may also appear as modem devices (ttyACM*). The particular Z-Stick can be identified by it’s Home ID, but to query this you have to first determine that a given device is in fact a Z-Stick and connect to it.
I don’t think there are any great solutions to this: some options are:
- Watch for the device node disappearing and disconnecting from the network if it does. This closes any open file handles and, if the device was the only ACM device on the system then it will be more like to re-appear as the same device again (
/dev/ttyACM0). Not ideal because replugging the device might unintentionally stop the application from working without the user knowing. - Connect to any ACM device that is attached if the one we were using was disconnected, or connect to all Z-Sticks attached. Better, but required indirection of
ZWaveNetworkobjects because the device name is configured in theZWaveOptionsobject that is created, locked, and passed to the network object at initialisation time.
The zwave-mqtt-bridge currently implements a solution using the watchdog Python module that gives you callbacks when directory contents change (i.e. files are created or deleted). On Linux, this uses the INotify API that is provided by Linux 2.6+.
Conclusion
This article has hopefully helped you to interface with Z-Wave devices, as well as provided an introduction to some of the intricacies of using Z-Wave from Python.
In future we’ll look at integrating the MultiSensor 6 and other Z-Wave devices with BoilerIO in more depth.
Useful reference material
- Vesternet: Understanding Z-Wave networks: Describes Z-Wave network concepts
- Vesternet: How Z-Wave Controllers Work: Describes device concepts including more information about command classes.
- Z-Wave Alliance: Specifications: This has the public Z-Wave specifications. This is useful to understand the command classes for devices and the structure of communications on the Z Wave network.
- Aeon Labs: MultiSensor 6 User guide: The “More advanced configurations” manual that talks about the supported command classes and behaviour of the MultiSensor 6. Especially of interest is the “More Advanced Configurations” section.
- Samuel Tardieu’s article about the difference between devices appearing as
ttyUSB*andttyACM*on Linux.


 ; there is then the heat loss through ventilation to add in.